It is completely undeniable that night photography has a wonderful magic. Starry skies, silent city lights or a close-up of the moon as it appears behind the mountains is something that simply grabs you. Night photography offers you the opportunity to capture moments that many don’t even see, transforming darkness into visual art.
However, taking a good picture in the middle of the night has its challenges and that’s what we’ll see now, some tips and tricks so you can overcome the technical challenges and capture the magic of the night in all its splendor.
1. Essential Equipment for Night Photography
You don’t need to empty your bank account to get started in night photography, but some specific equipment will make a big difference in your results.
The Right Camera: Your Ally in the Dark
Your camera must handle high ISOs well. Modern DSLRs and mirrorless cameras are excellent options, but even some smartphones with night mode can give you surprising results. Look for a camera that allows you to manually control the exposure and has good low-light performance.
What Features Are Crucial? Prioritize large sensors and the ability to shoot in RAW for more flexibility when editing.
Tripod: Your Best Investment
In night photography, a good tripod is not optional, it’s indispensable. Long exposures mean any movement will ruin your photo. Don’t skimp here; a stable and sturdy tripod will be your companion for years.
Key Features: Look for one that’s lightweight but robust, with adjustable legs and a ball head for greater versatility.
Accessories That Make a Difference
- Remote Shutter Release: Avoid vibrations when pressing the shutter button.
- Small Flashlights: Useful for illuminating close-ups or for focusing in absolute darkness.
- Extra Batteries: The cold night and long exposures drain the battery quickly.
- Cleaning Cloths: Nighttime moisture can fog your lens.
Recommended Lenses
Wide-angle lenses with wide aperture (f/2.8 or wider) are ideal for night landscapes and astrophotography. For urban scenes, a standard zoom will give you versatility to compose your shots.
Remember: the best equipment is the one you already have. Start with what’s available and gradually improve as you discover what type of night photography you’re most passionate about.
2. Basic Camera Settings for Night Scenes
Mastering your camera settings is crucial when working in low light. Here are the keys to controlling night exposure like a pro.
The Exposure Triangle at Night
ISO: Your Ally with Caution
In night photography, you’ll generally need to increase the ISO. Start with ISO 800-1600 and adjust as needed. Remember that higher values generate more digital noise, so find the perfect balance between brightness and quality.
Aperture: Leave It Open
Use the widest aperture your lens allows (low f/ numbers like f/1.8, f/2.8). This lets in more light, essential in the dark. The bonus: you’ll get that beautiful bokeh effect in distant lights.
Shutter Speed: Take Your Time
With your camera on the tripod, you can afford slow speeds. For urban landscapes, try between 5-30 seconds. For stars, follow the “500 rule” (500 ÷ focal length = maximum seconds before star movement is noticeable).
Focusing Techniques in the Dark
Darkness confuses autofocus, so switch to manual focus. Effective techniques:
- Focus to Infinity: Ideal for landscapes and stars.
- Use Contrast Focus: Aim at distant lights or illuminated edges.
- Use the Flashlight: Temporarily illuminate your subject to focus before shooting.
- Magnified Live View: Zoom in on the image on the screen for precise manual focus.
Recommended Shooting Modes
- Manual Mode (M): Gives you full control, perfect when you have time to experiment.
- Aperture Priority (A/Av): Useful when you need to maintain a specific aperture.
- Exposure Bracketing: Take multiple photos with different exposures to combine them later.
Practical Tip: Take a test shot, check the histogram (don’t rely solely on the screen), and adjust as needed. Night photography requires patience and experimentation.
3. Composition and Location Scouting at Night
Night transforms everyday places into magical settings. Take advantage of this natural metamorphosis to create impactful images with these strategies.
Identifying Points of Interest in the Dark
The human eye sees differently than the camera in night conditions. Before shooting:
- Arrive Early: Recognize the place with light to plan your shots.
- Look for Natural Contrasts: Where light meets darkness is often where the best photos are.
- Identify Silhouettes: Buildings, trees, or mountains against the sky create powerful compositions.
- Reflections: Water doubles the night lights, creating symmetry and depth.
Creative Use of Light Sources
Existing Lights
Streetlights, neon signs, shop windows, and car headlights are not obstacles but creative tools. Use them to:
- Create Bright Focal Points
- Generate Light Trails with Long Exposures
- Add Color to Your Compositions
Light Painting
With a flashlight or LED lights, you can “paint” your subjects or create luminous patterns. This technique allows you to add light exactly where you need it.
The Perfect Balance Between Light and Shadow
Night photography is not just about capturing light, but about taking advantage of its absence:
- Rule of Thirds: Still works at night. Place illuminated elements at points of interest.
- Frame with Shadows: Use dark areas to direct the eye towards illuminated areas.
- Create Depth: Layers of different light intensities give dimension to the image.
Locations That Shine at Night
- Urban Centers: Illuminated skyscrapers, traffic, and neon signs.
- Docks and Ports: Lights reflected in the water.
- Natural Parks: For starry skies without light pollution.
- Illuminated Monuments: Acquire a different personality at night.
- Fairs and Events: Offer unique opportunities for colors and movement.
Always remember to prioritize your safety. Visit unfamiliar places accompanied and carry additional equipment such as a flashlight and external battery for your mobile phone.
4. Advanced Techniques for Different Types of Night Photography
Once you’ve mastered the fundamentals, it’s time to explore specific techniques for each night photography modality. Each one has its particular tricks that will transform your images from good to extraordinary.
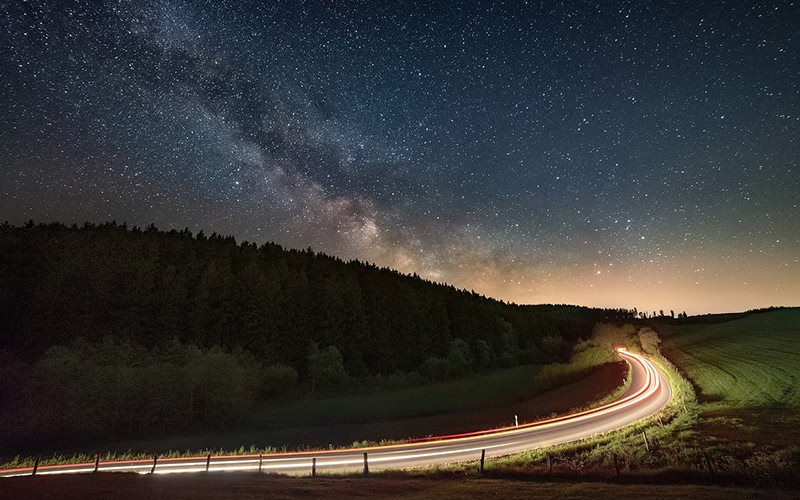
Astrophotography: Capturing the Universe
Astrophotography connects you with the infinite. To achieve impressive starry skies:
- Configure Correctly: ISO 1600-3200, aperture f/2.8 or wider, speed between 15-30 seconds.
- Use the 500 Rule: Divide 500 by the focal length of your lens to determine the maximum exposure without star trails.
- Seek Dark Skies: Get away from the light pollution of cities.
- Include Terrestrial Elements: Add mountains or trees as a foreground to provide scale and context.
- Plan with Apps: Use applications like PhotoPills or SkyView to locate the Milky Way or astronomical events.
Night Urban Photography and Light Trails
The city lights create a dynamic canvas for your photographs:
- Light Trails: Use speeds of 5-30 seconds to capture the movement of traffic.
- Blue Hour: Shoot during the 15-20 minutes after sunset when the sky maintains an intense blue tone that contrasts with artificial lights.
- Urban Composition: Include architectural patterns, lines, and reflections to create images with depth.
- Night HDR: Combine multiple exposures to capture both bright lights and shadows.
Night Portraits with Creative Lighting
Photographing people at night requires a special approach:
- Off-Camera Flash: Place it at 45° from your subject to create dimension.
- Mix Ambient Light: Don’t completely eliminate the surrounding light, seek balance.
- Experiment with Color Gels: Add tones that complement the background lights.
- Use Reflectors: To soften harsh shadows on the face.
- Lighting with Flashlights: An economical and creative technique to selectively illuminate.
Night Time-Lapse
Capture the passage of time at night:
- Absolute Stability: Secure your tripod against wind or vibrations.
- Intervalometer: Program one every 15-30 seconds.
- Consistent Exposure: Use manual mode to maintain the same exposure in all shots.
- Battery and Storage: Prepare for long sessions with extra batteries and large capacity cards.
Each technique requires practice, but the results will be worth every minute invested. The key is to experiment and develop your own style within each modality.
5. Specific Post-Processing for Night Photographs
The magic of night photography doesn’t end when you press the shutter. Post-processing is where your images come to life, revealing details invisible to the naked eye and enhancing the atmosphere you captured.
Exposure Adjustments and Detail Recovery
The main challenge in night photos is to correctly balance lights and shadows:
- Work with RAW Files: They give you much more room to recover information in underexposed or overexposed areas.
- Local Adjustments: Use masks or adjustment brushes to work on specific areas without affecting the entire image.
- Recover Shadows Carefully: Gradually lift the blacks to reveal details, but keep some dark areas to preserve the night atmosphere.
- Control Highlights: Reduce the brightness of streetlights or very intense lights that distract from the main subject.
Digital Noise Management in Night Images
Noise is the silent enemy of night photography:
- Selective Noise Reduction: Apply it more strongly in uniform areas like skies and less in areas with texture.
- Preserve Details: Find the balance between eliminating noise and maintaining sharpness.
- Stacking Technique: Combine multiple shots of the same frame to reduce noise (common in astrophotography).
- Convert to Black and White: In extreme cases, an artistic conversion can transform excessive noise into interesting texture.
Color and Contrast Enhancement to Maximize Visual Impact
The night has its own color palette that you can enhance:
- Creative White Balance: Don’t limit yourself to the “correct” one. Colder tones (bluish) reinforce the night feeling, while warm ones can create more welcoming environments.
- Selective Saturation: Intensify specific colors like urban neons or the blue of the sky during the blue hour.
- Clarity and Dehaze: Use these settings with moderation to add depth and separate elements.
- Subtle Vignetting: Darken the corners to direct attention to the center of interest.
Recommended Workflow
- Basic Corrections: Exposure, whites, and blacks.
- Color Temperature Adjustment.
- Shadow and Highlight Recovery.
- Noise Reduction.
- Local Contrast Enhancement.
- Selective Color Adjustments.
- Final Sharpening.
Remember that less is more. The goal is not to apply all possible adjustments, but to enhance the atmosphere you already captured. The best editing is the one that is not noticeable but subtly improves the image.
Conclusion
Night photography invites you to discover a world that many overlook. With the techniques we’ve explored, you now have the tools to capture those magical moments when the sun goes down.
Remember that mastering night photography doesn’t happen overnight. Each outing will teach you something new, and each mistake will bring you closer to that perfect image. Don’t be discouraged if your first photos don’t turn out as you expected; constant practice is your best teacher.
The most important thing is to develop your own style. Use these techniques as a starting point, but don’t be afraid to experiment and break the rules when your artistic vision demands it.
The night waits to be captured by your lens. Charge your batteries, prepare your tripod, and go create images that shine with their own light. Who knows? Your next night photograph could be the one everyone wants to have on their wall.
And you, what stories will you tell when others are sleeping?